
I’m fascinated by all the movies and TV shows of ancient medieval warriors sitting on a stump on the eve of battle, sharpening their swords and axes, and every time I see a scene like that, I wonder to myself, “Where did that guy get that stone to sharpen that knife, axe, or sword?” It literally looks like they picked up a nearby stone to use.
So this got me thinking, “Where can I find natural sharpening stones in my area that I can use to sharpen my edged tools in an emergency or when I am without a sharpening stone?” “Can I make my own?” And the answer to those two questions is YES, you can! You just need to know where to look. That’s the thing about finding natural sharpening stones—they’re everywhere once you learn what to look for.
You don’t need Amazon, a fancy shop, or a catalog full of imported stones. All you really need is your eyes, your hands, and a little rock/stone education and judgment to find local stones to sharpen your edged tools.
And yes, you will pick up a few useless rocks. We all do. But if you’re anything like me, you’ll have some fun along the way and learn as you go.
This article is about what actually works, why it works, and how to use it without overthinking the process.
What Makes a Good Natural Sharpening Stone?
The first thing we all need to know is what makes good natural sharpening stones. It’s pretty simple, a good sharpening stone has got be harder than steel. It also needs to be fine-grained, and consistent. By consistent, I’m talking about how predictable and uniform it behaves across its entire surface—every stroke, every inch, every time. This matters more than you may realize.

A consistent sharpening stone has the same hardness, grit, and cutting action everywhere. When you move the blade from one spot to another, the stone removes steel at the same rate and leaves the same scratch pattern. No surprises. No random deep gouges. Just steady, repeatable work. That’s it. Everything else is marketing fluff or geology vocabulary used to impress people at your local gem and rock shows.
Most effective natural sharpening stones are going to be rich in quartz—microcrystalline quartz, to be exact. Quartz cuts steel cleanly, wears slowly, and doesn’t fall apart when you bear down. If the stone feels sandy, crumbly, or looks like beach gravel glued together, walk away.
A quick field test (fast and reliable):
- Scratch steel with the stone (steel should lose)
- Wet the surface and rub with a finger (should feel smooth, not gritty)
- Look for uniform texture, no sparkly grains
Pretty simple & effective right?
Legal and Ethical Rockhounding (Yes, It Matters)
Before we get too busy talking about natural sharpening stones, let’s talk about the ethics of rockhounding. Yeah.., you can’t just grab rocks everywhere. Check out your local State Rockhounding Guides to see what stones you have in your State. National Parks are pretty much off-limits. Period! Most BLM or State Trust lands allow for small personal collecting. National Forests can vary by district. Whether you’re rock-hounding or hunting for sharpening stones, always check your local regulations. And make sure you get any required permits you need.
12 Proven And Simple Ways to Create Custom GPS Symbols
I recommend you stick to already loose material whenever possible you find it. Find natural sharpening stones you can pick up. Don’t dig no trenches. No scars. Leave the place looking like you were never there. That’s how we all help keep access open.
The Best Stones To Use And Keep Using
You can try several rocks, but you’ll find most won’t make the cut. These natural sharpening stones listed below will. Be sure you check out if your state has suitable stones to use for sharpening. Not all states will have good stones.
Fine to Finishing Stones
- Novaculite (Arkansas / Oklahoma)
Dense, smooth, and slow in the best way. This is the gold standard of natural sharpening stones, and yes, it deserves the reputation. - High-quality chert or flint (many states)
If novaculite is a scalpel, chert is a very good pocketknife. Same family, slightly rougher manners. - Dense slate (Vermont, New York, Pennsylvania)
Underrated. Slow. Quiet. Leaves a surprisingly clean edge if you’re patient.
Coarse to Shaping Stones
- Quartzite
Tough, aggressive, and honest. Great for fixing mistakes (we all make them). - Basalt (lava rock)
Not pretty, not refined, but it’ll put an edge back on a tool when nothing else is around. Think of this rock as a cutting or shaping stone.
If you’re building a kit from scratch, you will want one coarse quartzite and one fine chert to begin with. That’s a great combo won’t let you down.
Where People Go Wrong Picking Out A Natural Sharpening Stone
The biggest mistake beginners make with natural sharpening stones is assuming that harder always means better. Too coarse and you just tear up your steel. Too soft and you polish nothing.
Another common issue is pressure. Natural stones reward a lighter hand and more passes. Let the stone do the work. Forcing it just chews up the metal and ruins your edge.
And for the love of geology, stop oiling random rocks. Some stones like oil. Many don’t. Water is almost always the safest solution to use and readily available when oil may not. (Dry works too, but expect more wear on your edges.)
Using Natural Sharpening Stones in the Real World
Here’s how I actually sharpen outdoors or at home:
- Determine your cutting edge angle based on your cutting tool (chisel, knife, axe.) What will you be cutting with that blade?
- Start with a coarse stone only if the edge is damaged or your metal edge needs to be shaped.
- Move to progressively finer stones as soon as possible.
- Keep the stone wet and clean. Water is best for most natural stones. It keeps metal slurry from clogging the stones pores.
- Count strokes if you have to.
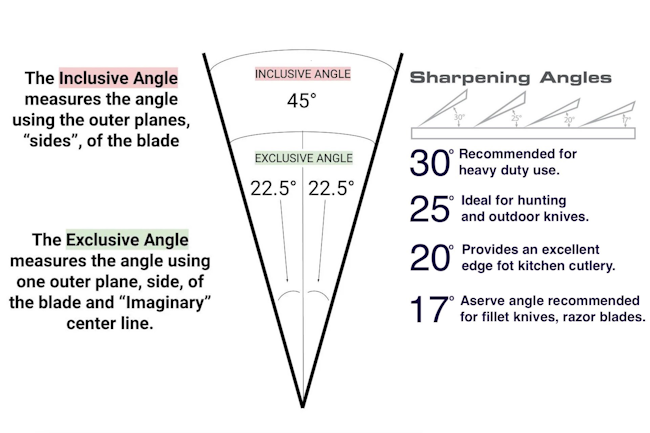
Determining the best edge angle will depend on what your knife will used for. Edge angle is measured per side (not the full angle). Edge angle is a question of balancing sharpness vs durability. A lower angle = sharper edge, but more fragile while a higher angle = tougher edge, but less razor-sharp. Here are some examples of edge angles for knives:
- Kitchen Knives: Japanese chef/Santoku Edge Angles: 12–15°, Ultra-sharp, best for slicing and precision
- Western Chef Knive Edge Angles: 15–20°, Paring knives Edge Angles: 15–18°
- Utility & Everyday Carry & Pocket Knife Edge Angles: 18–22°, EDC knives: 20° (safe default)
- Outdoor & Heavy-Duty Edge Angles: Hunting Knives: 20–25°, Bushcraft/Survival knives: 22–30°
- Specialty Edge Angles: Cleavers: 25–30°, Straight razors: 8–12°
The short version of this is: slow down. Natural stones aren’t in a hurry, and you shouldn’t be either.
How To Make Your Own Natural Sharpening Stones
You’re going to want to start out by finding flat or flat-ish stones. These stones, you’re going to want to shape it as flat and level as you can get it. Even “flat” stones usually aren’t flat enough for sharpening edged tools.
Select a candidate stone. Choose a rock that looks hard, dense, fine-grained, and consistent without cracks. Your also going to want to locate natural sharpening stones that are flat or as flat as you can find.

Test it using the scratch test. Try to scratch soft metals like copper or brass — a good natural sharpening stone candidate should scratch easily due to its abrasive minerals.
Shape the natural sharpening stones: You can use a hammer and chisel or another hard stone to roughly shape it into a flat slab. The goal for any sharpening stone is that the size and thickness will lay flat, and be stable in your hand.
- Hammer + chisel: for breaking the stone into a rough shape.
- Grinding on larger coarse stones – rub the rock on a bedrock outcrop or another coarse stone. You can also use concrete or pavement to rough shape your stone
- Sawing/cutting: with masonry tools (angle grinder with a diamond blade) if you want precise shapes.
Flatten and smooth the natural sharpening stones surface. Once you have the shape of the stone you want, you can use coarser sandpaper (60 to –220 grit for shaping) or another flat abrasive surface (like a diamond plate) to flatten and level the face you plan to use for sharpening.
- Flattening is critical — if your stone isn’t flat, you’ll get a bad edge.
- Diamond flattening plates: 150 & 600 grit for the rough shaping work, 600 & 1000 grit for finer polishing work. Both of these will work great for flattening your homemade stones.
- Silicon carbide abrasive paper on a flat plate: less expensive option.
- Wet sanding on flat glass with waterproof sandpaper: slow but effective.
- Progressively use finer abrasives like 400 to 1000 grit sandpaper until the surface is smooth and you get your finishing/polishing surface.
I don’t know about you, but after reading this far, can you see a side hustle making sharpening stones?
Final Thoughts On Natural Sharpening Stones
Natural sharpening stones aren’t about perfection. They’re about connection—between geology, steel, and your own hands. They teach patience. They reward attention. And they work far better than most people expect.
If you want laboratory precision, then go buy your stones from Amazon or your preferred retailer. No harm, no foul, right? However, if you want to learn a new skill, work on your confidence, and get some dirt under your nails. Try sharpening your knives and axes with natural sharpening stones you found yourself. Trust me, once this clicks inside you, you won’t go back.
And yes—you’ll still carry a pocket stone. I do too. (I’m practical, not stubborn.)
Want more practical, experience-backed articles like this? Subscribe to our newsletter today and get expert senior-focused tips, strategies, website updates, and announcements delivered straight to your inbox.